Sherwood Ranger - Making Parts - 1
*This web site is NOT owned or managed by G-TLAC. G-TLAC is not responsible for the content unless explicitly stated. See Disclaimer.
10/29/10 - Received plans
Plans came in the mail today. As they said, it's a CD full of files.
10/30/10 - Printing documents
Spent about 5 hours just printing. Printing, printing, printing. Clever way to ship a heaping pile of documents halfway around the world, but a bit of work on my end.
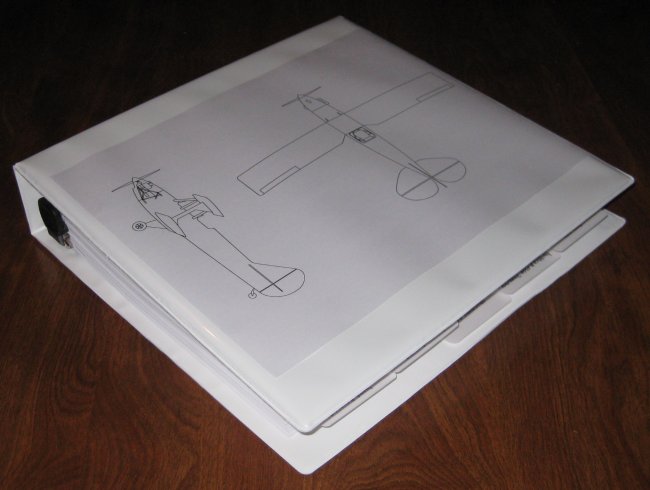
I bought a binder to put the main build manual into.
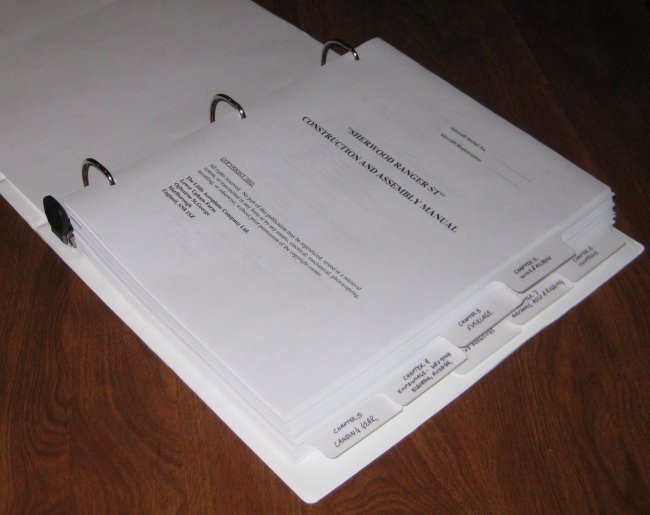
Trying to show the chapters - intro/materials/processes, wing and aileron, fuselage, empennage, landing gear, controls, airframe assembly and rigging, modification drawings.
10/31/10 - Formatting and printing
3hr - Downloaded a free .dwg viewer and started formatting the .dwg files (approx 24" x 36" prints) into first .pdf files. Then, viewing the .pdf files, I threw off screen shots into .ppt for printing on 8.5" x 11" pages. Most of the views in the .dwg files are quite small views of parts anyway, so other than the fact the drawings are already done, there is no reason they need to be printed at 24" x 36". 13 sheets of drawings. The file for sheet 6 didn't open, so I will email the company to see if they can just attach that one to an email.
The collection of drawing sheets, cut down to print on 8.5x11 pages. About an inch thick.
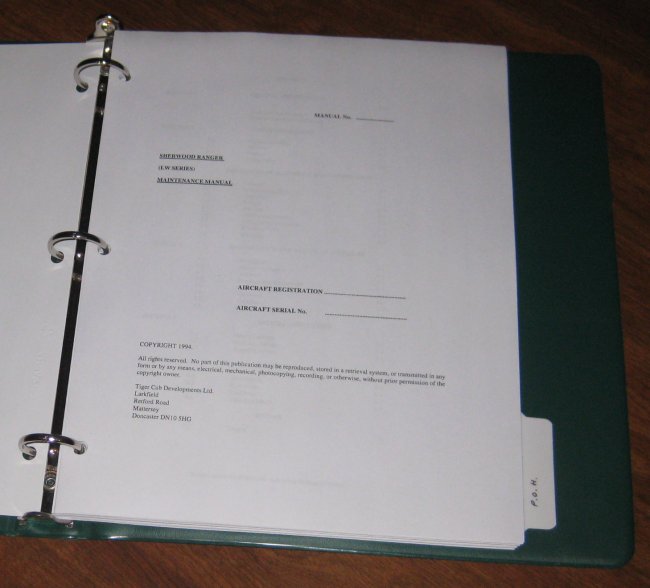
The maintenance and operating manuals. Another 100+ pages
11/1/10 - More formatting, parts list
2hr - A little disappointed - it appears some key tables aren't in the attached documents. Namely in the fuselage section, what would appear to be a table of tube sizes and lengths is missing. Maybe that info is on sheet 6. Started organizing a parts list. This was one of the most handy ways I plans-built the Sonex - sort the parts list by material dimension (thickness), then don't worry about what sheet it's on or what part number it is, or where in the airplane it goes, just make all the parts of that material at one time.
11/2/10 - Parts list.
1hr - got sheet 6 via email. Whew - that IS the missing info. ALL of the fuselage tubes are on that sheet. I mean ALL of them. A bunch of them are the same diameter with the same holes in each end, so for those (couple dozen), there's just a table of overall lengths.
11/3/10 - Parts list.
2hr - continuing to make up the parts list. Starting a spreadsheet for easy sorting.
11/6/10 - Parts list and brake pedals
1hr - entering data into the spreadsheet. I copied the key fields off EACH drawing page (about 150 pages when the 13 large sheets are blown apart into multiple screen shots to print on 8.5 x 11 pages) onto hand-written pages, then copied these fairly quickly into an .xls file. This will be the basis for another spreadsheet - hardware. Nope, they don't give either of these in the 500 or so pages of documentation that comes with the "plans". The cd is really based on building the kit, not working it from plans. But with the USD / GBP exchange rate getting worse by the day, G-TLAC's informing me of a price increase for 2011, and simply the logistics of shipping parts halfway around the world, I hope I can get a lot of this built with locally-available materials.
First parts, brake pedals.
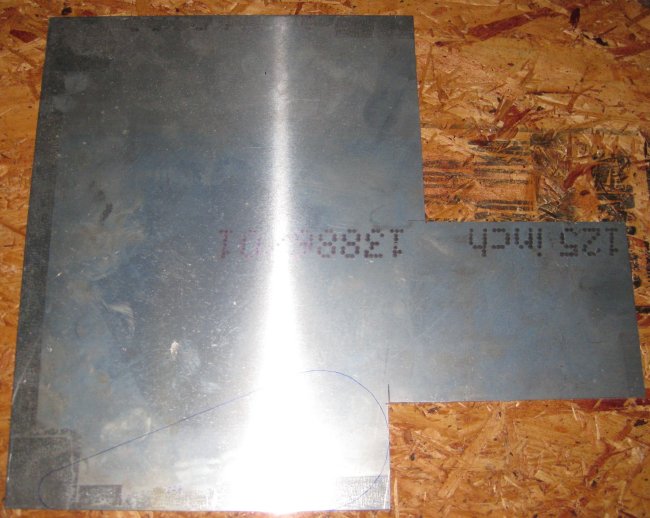
1hr - brake pedals. I'm still not sure about the 6082 aluminum called out for pretty much everything in the plans (there is one hogged-out part listed as 6061 and another as 2024, and very, very few 4130 steel parts), but I have a .25" thick foot-square plate of 6061 I "inherited" from my grandfather (left in his junk at the retirement community after he passed away, and my mom thought I, of anyone in the family, might find a use for it). So I carved off a slice for the brake pedals. If it turns out 6061 can't substitute for 6082, brake pedals aren't hugely critical or they are easy to make again. The one with lightening holes is 56g, without 76g, so all those holes are 20g.
11/8/10 - parts list
2hr entering more info into the parts list.
11/9/10 - measuring parts
2hr using the cad program (which was a time-limited free trial version), I measured the collection of parts that are labeled as "full size pattern" on the drawings. Since I don't know that the screen shots I made are "actual size", I would rather just dimension these un-dimensioned parts and build from there.
11/11/10 - .125 parts
1hr - I have concluded that 6061 can be substituted for 6082. I looked up the properties from several sources and contacted Aircraft Spruce and Wicks regarding availability of 6082. Wicks has not yet replied, but Spruce said they contacted all of their U.S. metal suppliers, and it's not available, at least not domestically. Near as I can tell, 6082 is essentially 6061 but made in England. Ok, so there's a slight difference in the composition, but as far as properties go, elongation in 6061 is slightly higher (meaning a little more stretch before it cracks), and its yield and ultimate stresses are the same to slightly higher than 6082 depending on what source I review. This airplane takes a LOT of material thicknesses, tube diameters and wall thicknesses. I mean a LOT, compared to a Sonex, which has exactly two thicknesses of sheet, then .060, .090, .125 and .188 for "plate" parts. The Sherwood calls for .018, .022, .028, .036, .048, .064, .188, .25 for sheet/plate thicknesses. In tubes, there's about 16 or 17 sizes, plus some square, rectangular, and u-channel sizes. The parts list so far looks like about twice as many parts as the Sonex, and I didn't even catalog the wood parts yet (plywood ribs, plywood sheeting, cap strips, a gazillion gussets, etc.). Though it might go together about as quickly because there are about 10,000 fewer rivets to be installed. Sorted the parts list on .125 parts and printed. Started drawing cardboard patterns for .125 parts, cut out a few.
11/12/10 - .125 parts continued
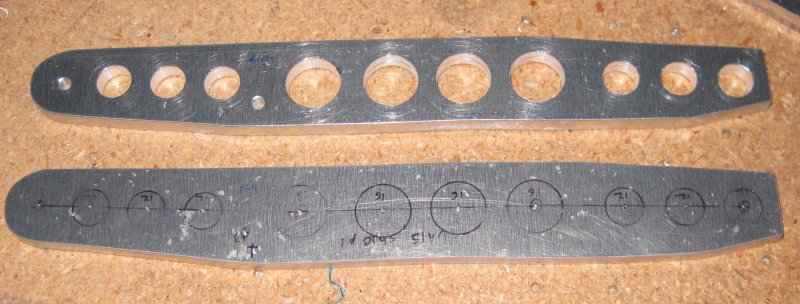
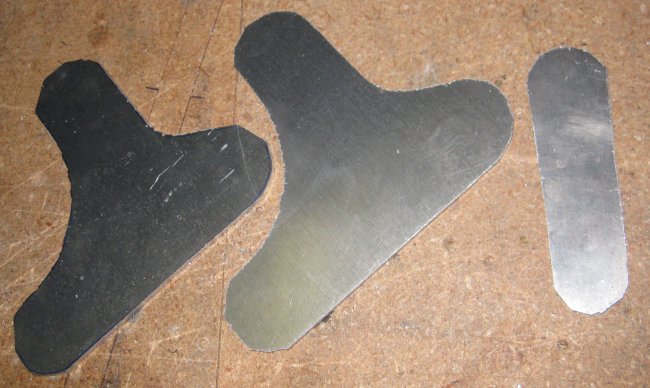
3hr - Completed cardboard templates for all but one of the .125 parts. Traced these onto a piece of .125 I had left from the Sonex project, about 11" x 39". It had some scratches, so I had to scrap out some material along one side. Got all but two .125 part numbers (5 parts) traced onto that part. One square foot will finish off the .125 parts easily. Cut out one part (one of the aileron hinges, wing side). 997 parts to go...
The .125 parts traced onto the large sheet. This was taken 11/17, after I had cut out the lower left hand corner to get 3 parts cut out.
First .125 parts, aileron hinges (lightening holes not quite up to size yet).
11/12/10 - general comment
Other than not having a parts list, materials list, or hardware list, as I don't think this package is intended for plans building (and even if it was, stuff like that is developed fairly easily by builders), the package appears to be very complete. I haven't dug into the explanations of the XP option (wing shorter by one rib bay) to see if that can be figured out from the information given, and there are two figures that were mentioned but not included in the wing chapter regarding the tips used on the XP. Rather than the fiberglass tips, whoever came up with the XP did the tips as fabric covered, which may be lighter weight, lower cost, and possibly simpler to install. Anyway, I guess by the time I get there I can figure out which wing tips I want to build. There are extensive maintenance and operating manuals included. In fact, the operating manual is really more than I would want to haul around, since it's required to be carried in U.S. registered aircraft (since found out it's not required in homebuilts, but a good idea). Fortunately the CD includes a Word .doc file for this, so I can edit it down, shrink it to folded-half-page size, and then print it 2-sided. In the wing chapter, the hardware isn't called out by AN hardware number (since found out that was only on one figure - easily fixed). I will ask for clarification on that, because the fuselage, tail, landing gear, and other chapters call out every nut, bolt, and washer by AN part numbers so all I have to do is put together a hardware list for ordering from Spruce.
11/12/10 - thoughts on build approach
Since I have the .125, I'll work on that as time permits. Meanwhile, I plan to develop several buy lists - tubes/metal, hardware, and stuff from G-TLAC. For the tubes/metal, I ran into a Sonex builder at Copperstate who gave me the names of two companies in Phoenix he has bought metal from. I think that would be a good possibility, as it would allow me to pay AZ state sales tax and avoid shipping charges on a 12 1/2 foot long bundle of tubes. For the hardware, I would like to amass a fairly complete list, then drive over to Spruce West, again to pay sales tax and avoid shipping charges. Might be able to fit that in with another reason to be in the So-Cal area (like the fabric covering Sportair workshop). From G-TLAC, if I can't identify someone in the EAA/homebuilding community around here able/willing to work a lathe and mill for me, then it will be a lot of the small machined parts, and the composite parts (turtledeck, cowling, etc.), and the engine mount.
11/16/10 - contact factory
Sent an email to G-TLAC with respect to the above build strategy. It's not clear to me what their marketing plan is, as their price sheet includes plans alone as well as "airframe section" kits (typical to other kit sellers - tail, wings, fuselage, landing gear, etc.), but not a whole lot of detail. So my question is essentially will they support a semi-plans builder like myself - provide the hardware lists so I can go to Spruce or Wicks for the nuts and bolts, get the tubes and sheet/plate metal locally, and only buy the more complex machined stuff from them. I guess I'll find out, and if today's answer is no, then that may be about the extent of this project.
11/17/10 - .125 parts
1 hr - got a little time to clean up in the garage and found roughly another square foot of .125, so all those parts should be covered, with possibly a little left over for a re-do if needed. Started trimming down the large sheet - one corner looked cut-able from two directions and it contained the two aileron bellcranks and maybe the elevator bellcrank.
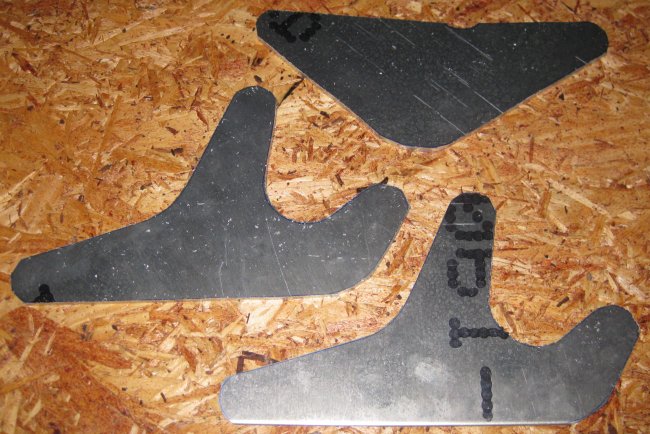
The aileron bellcranks and elevator bellcrank.
That last square foot or so of .125 with one of the few remaining .125 parts traced onto it.
11/20/10 - .125 parts
0.5 hr - rough cut 3 more parts out of the large sheet. Also made a cardboard pattern for the remaining .125 part and traced it (4 times) onto bare stock.
11/21/10 - factory reply
Reply to my 11/16 email. All favorable, I think. They concurred on the substitution of 6061 for the 6082 and said something that implied they might make the switch themselves as 6082 is becoming more expensive and less available. They also indicated they could sell a collection of parts rather than the entire kit, though I know that isn't a good moneymaker for them. My vision would be for them to set up a "kit of parts" specific to the export market, where the builder buys easily available stuff like the nuts/bolts/washers, bare lengths of tube and some sheets of metal to cut the various parts from. Then G-TLAC would supply the few composite parts and the more complicated machine parts (those requiring a mill and lathe). I know they also want to cut tubes to length and drill them, as well as NC-mill the flat parts, but those are both fairly easy things to do, and shipping bolts around the world isn't a great idea to me because they are readily available nearby.
11/24/10 - Interplane strut parts
0.5 hr - reviewed the drawing for the interplane strut webs. Marked this out on .032 sheet. Cut the length of the 4 parts from the larger sheet. Cut one of the webs off the cut-to-length sheet.
11/25/10 - Parts list review
0.5 hr - filtered on the .036 and .048 parts. These will be fabbed from .040 and .050 6061, as those are the closest available thicknesses of these parts, and a few thou over the relatively small area of these parts will be slightly more than zero weight add, but not much. Realized later that I had labeled some of these thicknesses as "sheet" and some as "plate". Corrected the spreadsheet so all of these are "sheet" and re-filtered. Looked through the plans pages to collect the overall dimensions of these parts to add to the spreadsheet. Goal is to determine an overall sheet size needed to include all these parts.
11/25/10 - Interplane strut parts continued
0.5 hr - made several more cuts on the interplane strut parts. Using my favorite left-hand (red handle) hand snippers. I don't like the "straight-cut" "Andy" snips (available at Home Depot) even though these are intended for straight cuts, they leave a funny edge - a second stress-riser line at the width of the blade. These LH's leave a rotten serrated edge on the "down moving" blade, so you want to keep the part on the left side of the cutter. Thus I can't just cut the parts out and since they are simple rectangles, make one cut between the two and keep both sides - I actually leave a quarter-inch-wide "kerf" of throwaway material between each rectangle that gets the serrated blade side of the cutter - so the serrations all get thrown away, and the parts themselves have a smooth edge to be finished with a little filing and the scotchbrite wheel.
11/25/10 - Parts list review continued
2 hr - filtered on the .064 and .25 parts. Looked through the plans sheets and calculated the overall dimensions for these. Found a few that I had not measured completely in the .dwg viewer program, so measured these. Started figuring out how much .040, .050, .063, and .25 I will need. Roughly laid out the parts on a 600x600 mm grid (just under 2 feet by 2 feet). Figured out how many of these of each thickness are needed. From the Spruce catalog, the 2x2 in .040 and .050 are less expensive per square foot than the 2x4, which makes sense in that they can sell cutoffs that end up at 2x2 that would have remained unsold, and that it's more expensive to have a larger uncut sheet of anything. However, at .063 thickness, the 2x4 is less per unit than the 2x2. But if I end up ordering from them, I'll keep it all at 2x2 for shipping.
11/26/10 - Interplane strut webs
1 hr (solid) - finished cutting out 3 of the 4 interplane strut webs. Filed the edges smooth, then ran them over the scotchbrite wheel, both sides. Finished laying out the hole pattern on the "master", center punched the holes, drilled to #40. Cleco-clamped the master to one of the blank ones and started drilling through. Drilled about a dozen holes and filled these with clecoes.
11/27/10 - Wing root fitting
0.5 hr - realized I might have enough .25 6061 to do these, so I laid the part out on thin cardboard, cut it out and traced it onto the .25. I can do all 4, if I re-layout the seat belt mount plates on a 2.5"? wide .25 thick bar of 6061 that I have had since the first Sonex project - back in the days when people hadn't quite worked out the materials list, the guy who started Sonex #42 had bought a 6 foot length of .25 bar. But there isn't any in a Sonex. Anyway, I won't have to hunt down any .25 6061 (one thickness that Spruce doesn't carry in larger plates, they do carry it in bar).
11/30/10 - Parts study
1 hr - flipped through the build book and looked at the figures. I had thought the wing section was weak in defining the hardware (nuts/bolts/washers), but I see it really isn't. Given that the rest of it is so complete, I should be able to come up with a 90+% hardware list. Then just round up 10% on everything, and it should be just about there.
12/1/10 - Parts listing
1 hr - started on the fuselage (chapter 3) in listing out the hardware (nuts and bolts) required. Only got part way through, but the other chapters I believe may be less involved, as this includes the bunch of fasteners to bolt/rivet the entire fuselage together, but also the tail. This is structure only, so it doesn't include the control pushrods/cables or the rigging (tail support cables).
12/2/10 - Parts listing
1 hr - continued on through a few more chapters of parts listing. Landing gear and empennage.
12/3/10 - Parts listing
1 hr - put the above hand-written parts lists into excel. That way, with a few easy filters and sorts, I can total up all of the AN3-17A's, etc. and start to form a shopping list.
12/3/10 - .250 parts
1 hr - Carol took the kids to their swim class today, so I decided to see about cutting out the .250 parts. Got all but one of them done, but there aren't very many. (This doesn't count the numerous spacer-type parts that are from .250 stock, but require milling curved shapes into the surface.) Also cut the .188 parts to small blanks from larger stock. The only .188 parts are some heavy tang-type shapes that anchor the flying/landing wires to the wing spars. The bandsaw blade is now making more heat than cut, so it's time for a new one. Got an entire Sonex out of it, so that's not too bad.
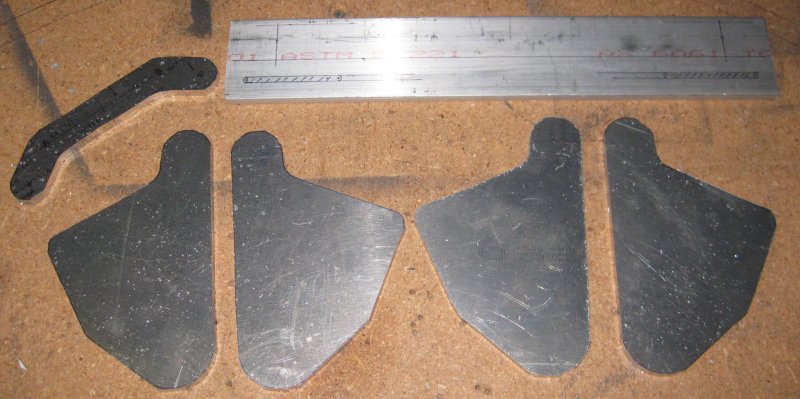
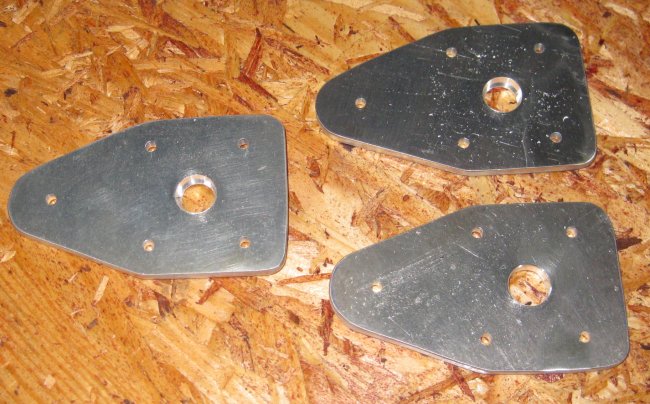
.250 parts - wing root fittings, seat harness attach fittings.
.188 part blanks - flying/landing wire tangs. Only 8 required, but I had some extra material. One end is labeled BIG or B because one end is slightly larger and gets a different size hole.

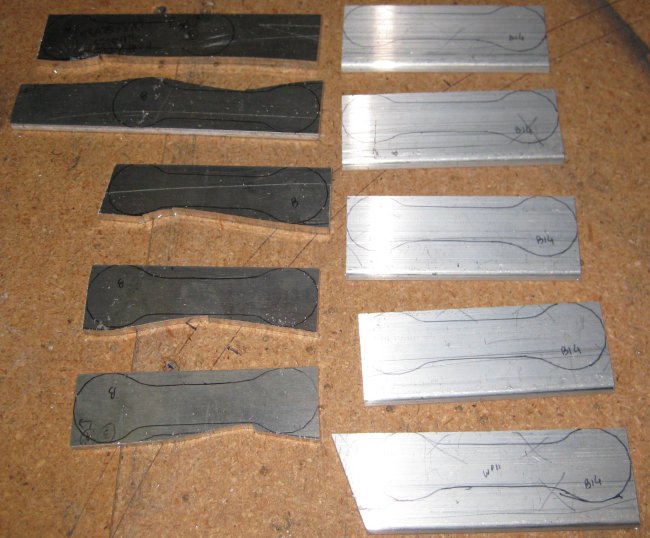
The cardboard patterns for the .125, .188, and .250 parts. The only .188 parts are the flying/landing wire tangs. The only .250 parts that I made a pattern for are the main spar root fittings (left side of the photo). There are a couple more .250 parts, but I just drew them out on the metal directly. I think one of the patterns didn't make the photo, so that is 17 patterns for these thicknesses.
12/4/10 - Parts listing
3 hr - Finished going through the book (first pass) and putting all the info into an excel spreadsheet. Using current Aircraft Spruce prices, it looks like about $105 in bolts, and about $70 in nuts and washers. The rivets and other misc hardware will take a while longer.
12/4/10 - .125 parts
1 hr - cut the remainder of the larger piece of .125 into the separate parts. Did not cut down to the exact perimeters of the parts, just split the large piece up and got the parts out of it.

Only had to flip it over and make a blind cut once. And then, it was only about 1/2 inch. If I did this again, I would create a few straight-across cuts to be able to work with smaller pieces. As it was, I took parts off each end working towards the middle.
12/5/10 - Parts listing
1 hr - sorted the hardware list by rivets, and then sorted the rivets by part number to put all of the same size together. Then started looking at the actual figures that call out the various rivets to check the stack height being riveted. I did this to check that the numbers being used in these call outs align with rivets I am familiar with. Seems to mostly be the case, and a little research online shows I should be able to find all the needed sizes from US sources.
12/5/10 - .250 parts processing
1 hr - processed the four wing root main spar fittings over the belt sander to remove the bandsaw marks, and also ran them on the Scotchbrite wheel to smooth off the belt sanding and edge burrs. Will need to use a sanding drum on the Dremel to get the inside radiused corner. Also did a couple of the .125 parts that were cut all the way to the perimeter line. On the 2nd one, the last one I was going to do for the night, it slipped out of my hand on the Scotchbrite wheel, and for a second there, I was Scotchbriting my finger. Fortunately it's not a very aggressive wheel - just a blister.
12/6/10 - .125 and .250 parts
2 hr - got the four wing root main spar fittings finished around the edge in the inward cut part of the profile using the sanding drum on the Dremel. The store was out of the rough sanding drums, so I bought the medium. Turns out I had some of these at home. Also turns out they last about 2 seconds. Also got the 10 pilot holes drilled in each part. Profile sanded and scotch-brite-wheeled a couple of .125 parts. Center punched and pilot drilled a few. Cut a few from the rough-cut blanks (picture above) using a new bandsaw blade, and boy, does this blade stink. Its cut is about 3x wider than the previous blade, and part of that wideness is that the cut itself is extremely rough. Supposedly this is an exact replacement for the previous blade - same width, same TPI, same brand name. But man, if this saw had this blade when I first got it, I would have really thought bandsawing was a terrible way to make parts. I'm going to have to try yet another blade. This blade might be ok for wood or stuff where you don't care to be within 1/8" of the line, but when you have to remove all extra material very slowly with a belt sander, I want the cut to be quite close to the line.
Click to join sherwoodbuilders