Sonex 815 - Continuing the Kitlog - 2
*This web site is NOT owned or managed by Sonex, Ltd.. Sonex, Ltd. is not responsible for the content unless explicitly stated. See Disclaimer.
2/21/10 Panel - Add accelerometer
Started adding an accelerometer in the RH panel. Found the screws attaching the blank off plate (containing the passenger intercom jacks) were too short. Also unnecessarily pulled off the reset knob (a tiny retention pin) as it turned out the reset knob location doesn't line up with the hole pattern, so I needed to file out the hole to make room for the knob. Met a builder from NH at the hangar to talk about the project. He's just starting on a kit. Later, got screws at the hardware store.
2/23/10 Install G-meter, continued
Stopped by the hangar on the way to work and finished off installing the g-meter. Had to put the reset knob back on, then the screws that attach it to the panel.
2/24/10 Panel - Bracket for intercom jacks
Made a support bracket for the passenger side intercom jacks that were in the hole where the g-meter ended up. Installed this on the lower RH side of the panel.
2/25/10 Flight 118
0.2 flight time, 2 ldg. Wind 320 at 11 g 17. Pretty miserable. Left work early (had something else to do), stopped by the airport and did a very quick flight. It was so miserable out there I could only bring myself to do 2 landings. Groundspeed vs. airspeed on downwind was ridiculous. Overshot the turn to base both times and had to drag it in with a lot of power (and airspeed) to the landings. The landings were smooth, and I didn't have the time to really go anywhere, so enough of messing with this wind.
2/26/10 Engine - Cooling duct
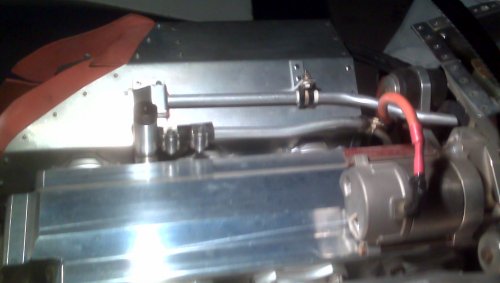
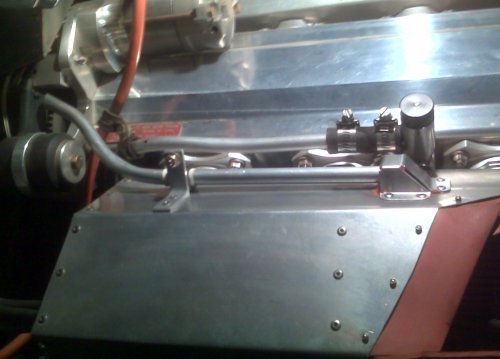
Built a little "doghouse" for the RH ignition cooling. The Sonex baffle has a little tab that gets pushed into the airflow to draw off air to cool the RH ignition coil. I believe this is not sufficient as I am getting what appears to be lean running after about 45 minutes of run time. This has happened to me twice, and it is very spooky. First time was on the way back from Copperstate, the 2nd day. Last time was the flight w/ Dad a few weeks ago. I posted the question to the Jabiruengines group and they pointed to many things that would in a way make sense, but didn't check out. Lack of fuel flow is complete baloney, as how could I make 2 more flights w/ normal performance if that was a problem (not to mention 60+ hours of other flights w/o noticing this problem). Someone mentioned that intermittent / overheating ignition coils would show up like a leaning of the engine, and that's what is happening. For the LH side, cutting a little flap into the Sonex baffle should do the trick, as the coil is right there behind the baffle. But for the RH side, I'm going to run a tube directly from the existing air outlet in the baffle to the coil, similar to what the Jabiru engine installation guide shows.
2/27/10 Landing Gear, Wheel Pant, Tire valve door
Cut the opening for the tire valve access door in the RH wheel pant. Cut down the doubler plate I had installed at the mount hole location, and used the remainder of the doubler plate as a mounting plate for the Southco receptacle. Cut the door out of .025. Started looking at the hinge, and figured it will need a spacer on the wheel pant side to get the door at the right depth. Cut 2 spacers out of .060.
2/28/10 Engine - Install Cooling duct
Added the ignition cooling duct to the RH engine baffle. Riveted on the small box covering the existing air outlet (as supplied by Sonex), and sealed the corners of this box with hi-temp RTV silicone. Bent the tube to align with the ignition module and cut the tube to length. Located the support bracket on the engine baffle, drilled and installed this. Then disassembled the LH cooling baffle to trim a bit of the back plate to form more of an opening at the LH ignition module. This one is so close to the baffle, there isn't really a duct that can be made, so hopefully enlarging the opening will keep it in good shape. Found that the small oil tubes between the cylinders were contacting the baffle - seems like every time I take these off I remove more baffle material for clearance. Also the baffle is cracked at both slots for these tubes. Not a big deal, as it is secured by the multiple valve cover bolts and the hinge I added for spark plug access. Also quickly fit checked the wheel pant with the door opening - looks about as good as it will get. Need to be sure the door opens a good 90 degrees.
3/1/10 Updating a List
Looking back at the last list, I actually got some stuff done. Here is the update: