1955 Buick Special Custom - 02
3/14/13 - huge leap of faith
Sent the rest of the money.
3/25/13 - title arrives
Not titled in the name of the guy in Rockford, but a guy in Kentucky who was the previous owner. Signed by the guy in Kentucky, but not notarized. May need to send this back to KY.
Trucking company gave me an estimate that the car would be picked up today. Don't think it happened.
3/26/13 - checking things
With the title, google'd the guy in Kentucky. Got a phone number. Gave him a call. He said he sold the car to the guy in Rockford about 2 1/2 months ago. He's also still got a '67 Chevy pickup on Craigslist. I didn't ask much, since I think it's a little weird to be speaking with someone further up the ownership chain, but his name is on the title.
Got an email from the trucking company that the car was picked up.
3/28/13 - reached the driver
Tried a couple of times on Wed / Thurs, got through today. He said he was near Liberal KS, had a drop off in Hereford Tx Thurs night, Carlsbad NM Friday AM. Then to Tucson Friday night.
3/29/13 - message from driver
Message that he might be able to drop off the car Friday afternoon. Turns out, not so much. Exchanged calls around 8pm, 9pm, and 10pm, and decided the Corvette in the way of my car was going to take him into Saturday morning.
3/30/13 - Car arrives
As of late Friday night, driver had planned my drop off for ~930 Saturday morning, which turned into ~1130 by the time I heard he was ready to go. He was willing to try the Safeway parking lot maybe 0.7 mi. from here. He had originally proposed Tangerine road, which would have left me with maybe a 10-mile drive to get the car back here. As it is, I made the short drive back from Safeway no problems.
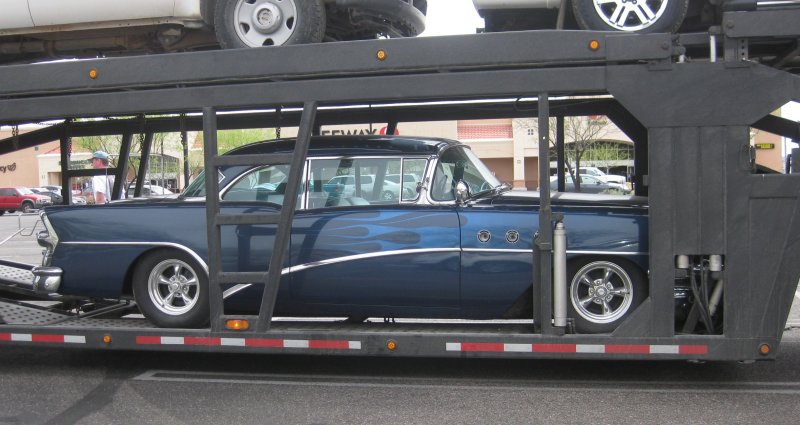
All socked down in transport position.
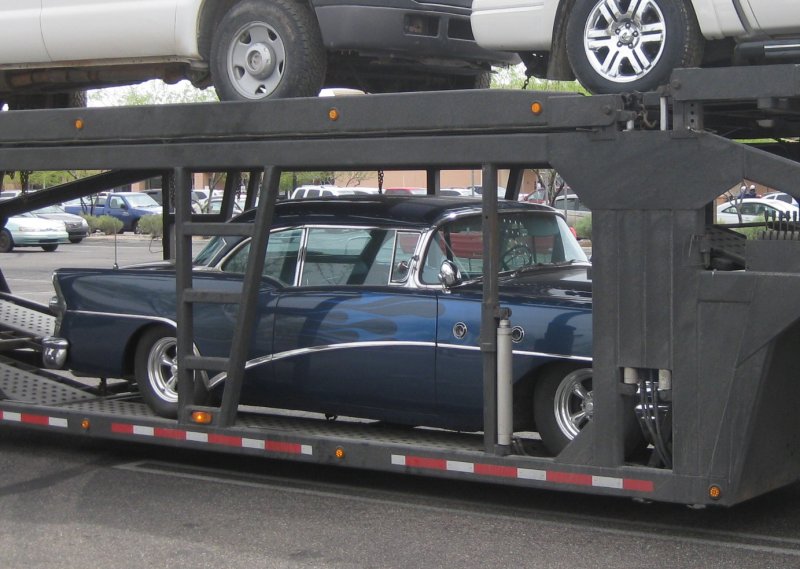
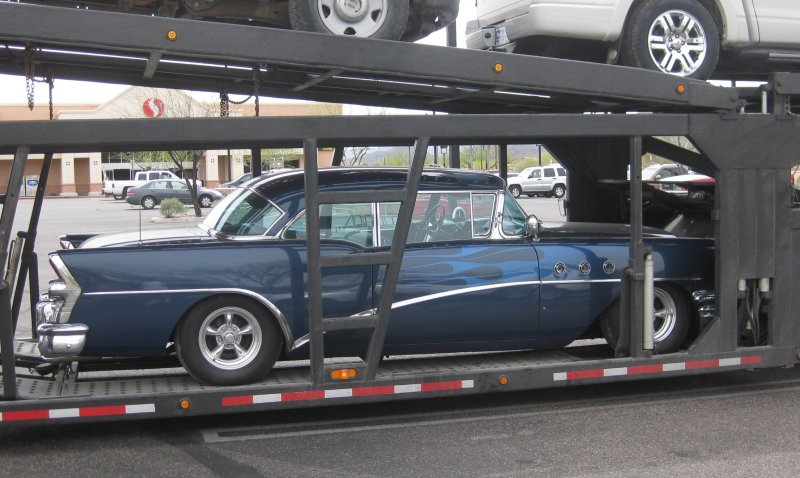

Released from the hold-down chains, deck lifted, got in, ready to roll off.
Impressions - the brakes take planning. Not sure if they are power-assisted at all, but drums all around is pretty leisurely. Car was pretty dirty from the truck ride, but I washed it and vacuumed and it worked out ok. Big problem on arrival - the door popper wouldn't pop the door open, and the RH door was too close to the trailer frame (though we tried that one too). The driver somehow got the LH door to pop open (no outside handles), so he got in and got it off the trailer.
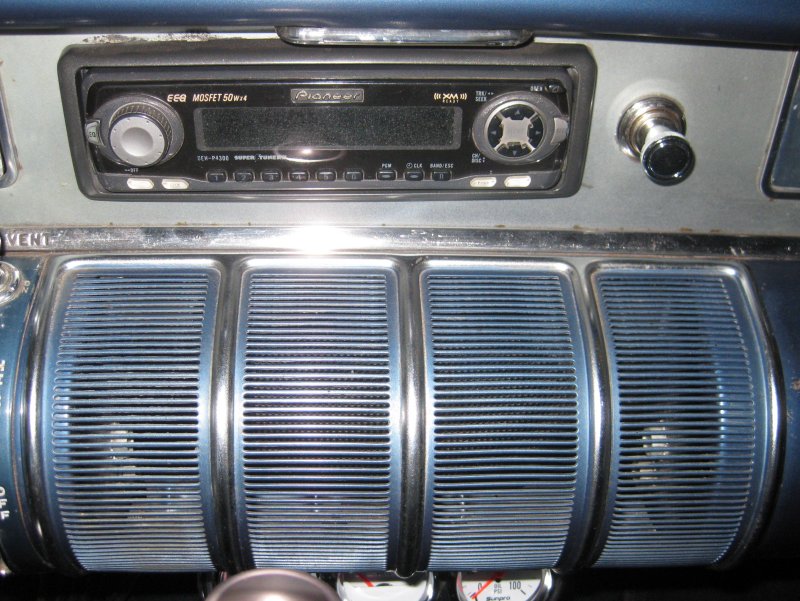
Next level impressions - the motor is burning oil. The transmission leaks. The wiring under the hood (and under the dash) needs some cleaning up. Didn't try the wipers, but the running lights and headlights work. Stereo works. Blower fan works, though I'm not sure exactly what it blows on (no dashboard vents).
The window mechanisms all work. The back windows have a complex dual-action to rotate back, then down to give that open no-post look. Pretty cool. The RH rear window handle is slipping. Need to help the glass up. Not sure if that's just the handle or something farther in the mechanism.
Found the secondary hood latch - took a minute of fumbling around with the primary latch, then noticed a secondary which is exposed when the hood pops up a little.
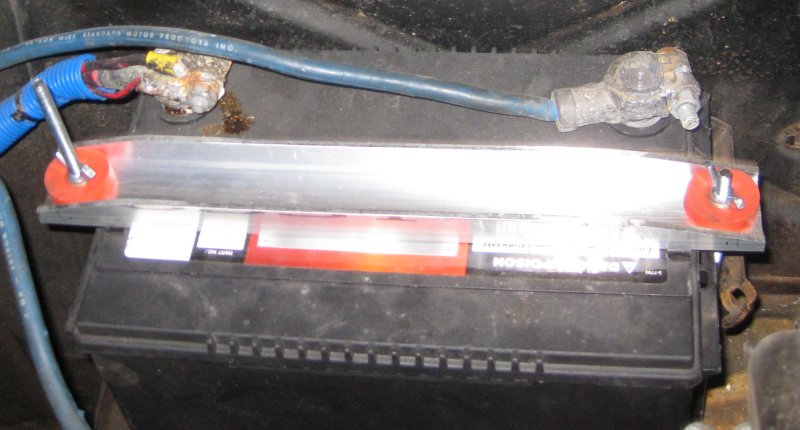
Oh, there's coolant where the hose exits the top of the engine - hope that's just a hose leak. Battery not held down with anything. It is 12V.
There's no jack or lug wrench for the spare tire, but there really is a spare tire back there. Trunk looks good. Played with the driver's door popper a few more tries and heard something fall off inside the door. At least it worked to get it off the transporter. Dome light is dead. Portholes have light bulbs inside. The wiring is visible inside the fender. The LH porthole power wire was dangling (exposed leads), so I taped that off so it wouldn't cause trouble. The RH porthole lights don't work, but the wiring appears to be stable. The original horn is up front, so I might give that a try. There's an ooga horn (which is really loud). So the horn works.
Radio antenna mast - manual extension. Doesn't go all the way down. Not sure if where I pulled it to is all the way up.
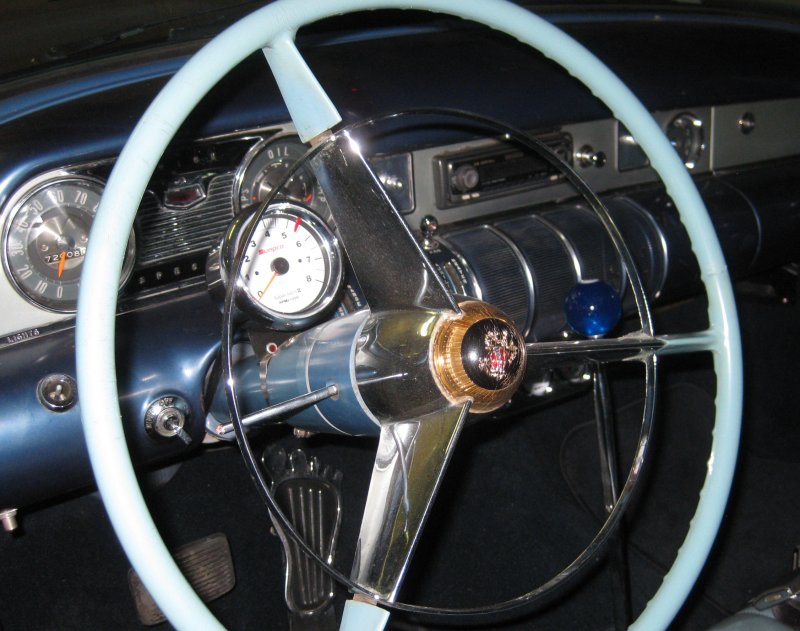
Dashboard switches - someone was fascinated with a skull motif. May need to change those to something more traditional.
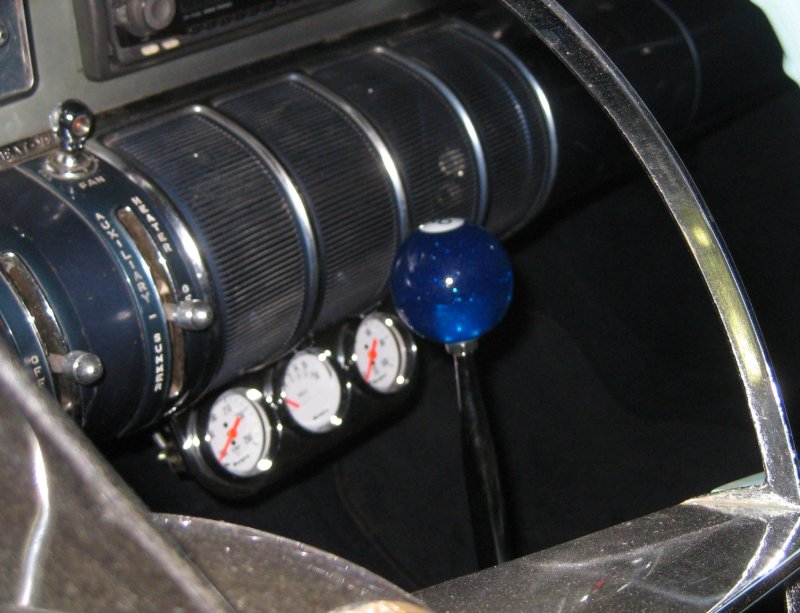
Transmission shifter - very loosey-goosey on the transmission, but it does shift. Shift knob is held in place via gravity (it's just sitting on top of the shift lever).
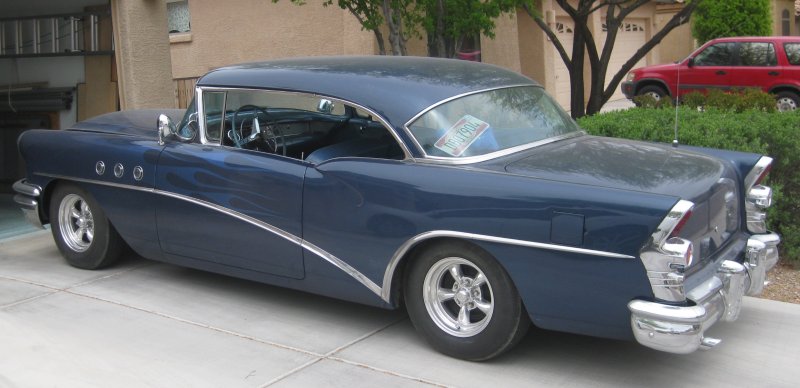
So overall, may not be quite worth what I paid, but it does run and drive, and looks pretty awesome from 20 feet. Definitely not a rust-bucket. A very solid car.
Things it came with - 1955 owner's manual. Original bill of sale from 1955. Fender skirts. Side pipes - delivery driver was nice enough to strap those to the front of his trailer because they were not attached to the car (would kill ground clearance for trailering). Floor mats - 3 of 4 look really nice. The driver's one is kind of worn.
Back in the driveway - not yet washed.

The hood is unlatched.
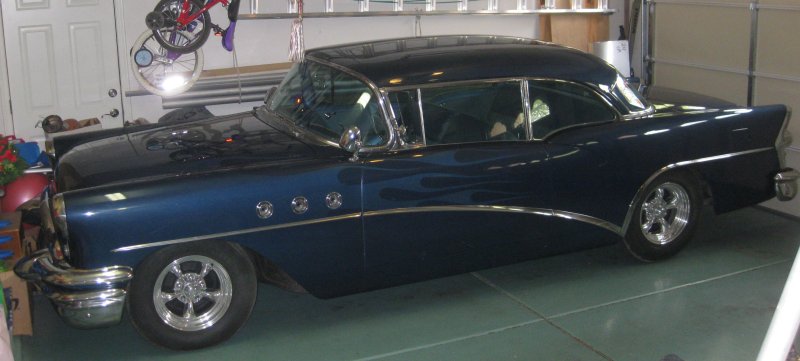
Washed and home in the garage.
Went back out after dark to check lighting. Read the manual and found out that the headlight switch, aside from having 3 pull-out positions (off, parking, headlights) - also has 4 rotational positions. Pulling out to headlights, noticed a small red light between the turn signal indicators on the dash was on. Wonder if that's the high beams. Hit the high beam switch - yes, and a WHOLE BUNCH of red lights under and in the dash go ON with the low-beams. That's not stock, and somebody had a fascination with red lights! The added-on gauges under the center of the panel have night lighting (low-beams only) as well. And the red light discovery revealed that the original radio speaker location (that grille in the center of the dashboard) has a little panel with 2 red lights in it.
3/31/13 - dashboard work
Got out in the garage for a little while to de-activate and remove the red lights from under the dash. Discovering that whoever did this was a fan of twist-it-together and add-some-electrical-tape method of wiring. Got 3 little dome tail-light assemblies out from under the dash. Not sure what these would ever be used for really - maybe very small trailer tail lights? Discovered that the add-on gauges in the center of the panel are also drawing their night-lighting power from the same line, so re-connected that. Cut the line to the 2 lights in the radio speaker grille. Found an actual speaker up under there - it's modern, so not sure if it's hooked up or what.
Bought a battery hold-down at the auto parts store. Actually, bought two - one long length, the other goes across the middle of the battery short-ways. Not sure which will fit.
Later... Made up a beam to hold the battery. The short-ways bracket won't work - no room against the fender well for a hold-down rod there. So long-ways it is. Had a piece of cutoff 1.25 x 1.25 x .125 wall Al square tube. Cut that down to length, drilled 2 holes, got that stuck down over the battery. Thing I don't like - if the battery does shift, that's one mother of a conductive beam of aluminum to weld itself over the top of the battery. So will look for a perimeter-frame type setup. Getting the modern hook-shaped hold downs in place wasn't too bad. Had to cut down the forward one by about 2" and angle it through a pass-through / lightening? hole behind the horn, but it fit.
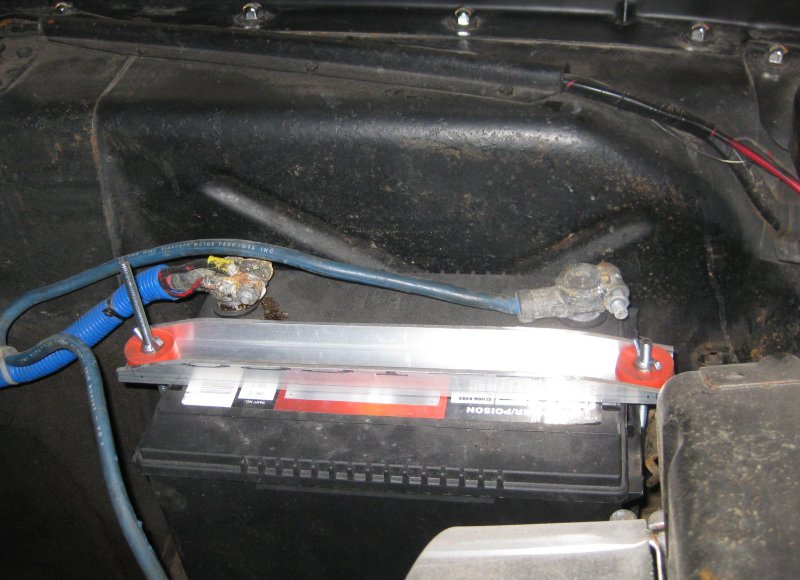
Ok, will go back and trim down the rear bolt, but at least it's not going to just fall off in a turn.
Later... On a quick trip out to the garage, grabbed some sockets to check the lug nut size. Oh, the bane of pretty much every car I buy - locking lug nuts. These are between 17 and 19mm, and between 11/16 and 3/4 inch. Every single one of them is "locking", so it's not a one-per-wheel deal, but some kind of funny pattern on all 5 per wheel. Of course, the secret de-locker is nowhere to be found. But found some shift knobs on americanshifter.com that look pretty cool.
Ok, these appear to be spline-drive lug nuts. But whose? None I can see list just the socket except for McGard - and these nuts don't look like that. And I remembered why I fairly recently relived the nightmare of locking (oddball) lug nuts - my daily driver Honda - I lost the key myself. I bought the car from the dealer, so I went back to a Honda dealer, and they tried all 14-or-so keys for the factory lug locks that they had. None fit. So the dealer I got the car from was using non-Honda locking lugs (probably because they were a little cheaper). So I went to the tire dealer that I've bought several sets of tires from, and they busted them off (or they went through their bucket of keys until they got the right one) - and they were good enough to just give me some Honda lug nuts they already had. I'd bought what I thought were the right nuts at a local auto parts place and the tire dealer told me they weren't - that Honda uses something different. Anyway, they gave me 4 lugs to "unlock" the car, so I returned the wrong ones to the auto parts place. But now, the nightmare begins again. I think the spline drives look cool, but if I can't figure out a key, they're going the way of all locking lug nuts in my life (off the car).
Found a marking at the base of the lug nuts - no brand name, but 9/16-18 R H/T. Figured out this means the wheels are 9/16-18 thread, Right Hand Thread. So that doesn't help much. And most of the spline-drive nuts I've seen are 7-spline. These are 6. So worst-case, maybe a vise grip pliers???
4/1/13 - made a list
Made a list of about 30 things to work on and/or check. Most of it is minor. Almost none of it will affect the drivability. First item to work on - the back bumper area. Took off the screw head covers from the back-up lights. In doing this, realized the red lenses on the back-up lights are not original. The thought had crossed my mind that this was some sort of base model that only had red reflectors where the back-up lights go. Not so - there are actually back-up lights in there. Not sure if they are actually hooked up to the transmission or shifter, but at least there's something in there to work with. Then under the back bumper I had seen a little bunch of wires. Turns out they were all cut off, so whatever it was isn't there anymore. So I clipped some zip ties and removed that. The LH license plate light doesn't work - but it's connected to a different wire out of the trunk than the RH, so it may just be a bad connection.
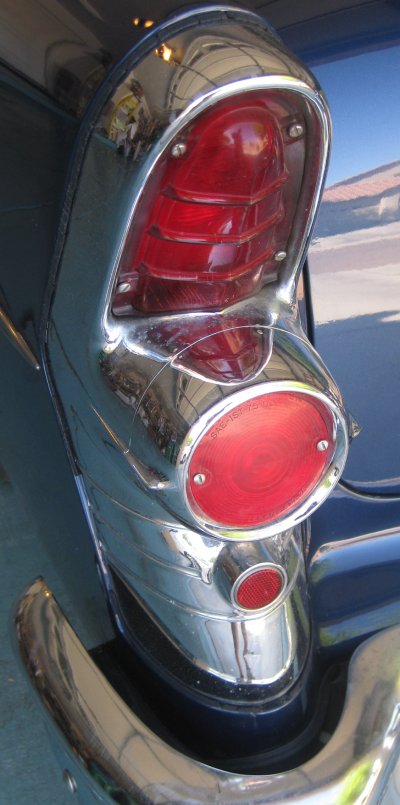
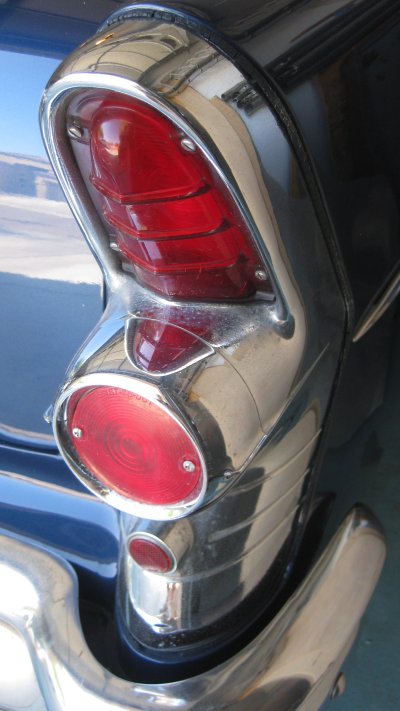
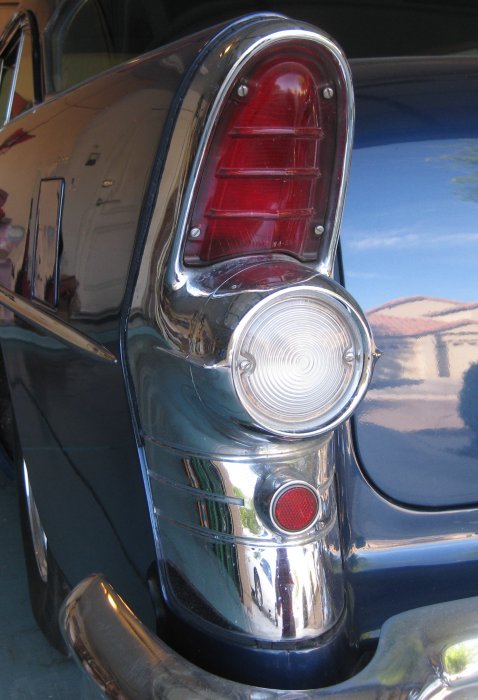
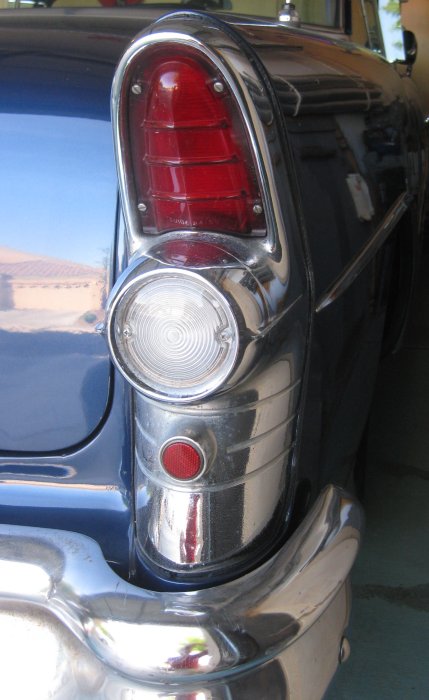
That larger red circular lens in each tail light? That's supposed to be clear/white.
I also figured out that rubber part around the perimeter of each light housing is not very expensive for '55's. It's molded channel stock that just wraps around the perimeter - it's not molded to the shape of the light housing. Someday I might get to that level of renewing things... Must resist temptation to buy and replace every possible part - I don't know how much I'm in for yet with the expensive stuff (motor, transmission, etc.)
4/2/13 - list gets longer
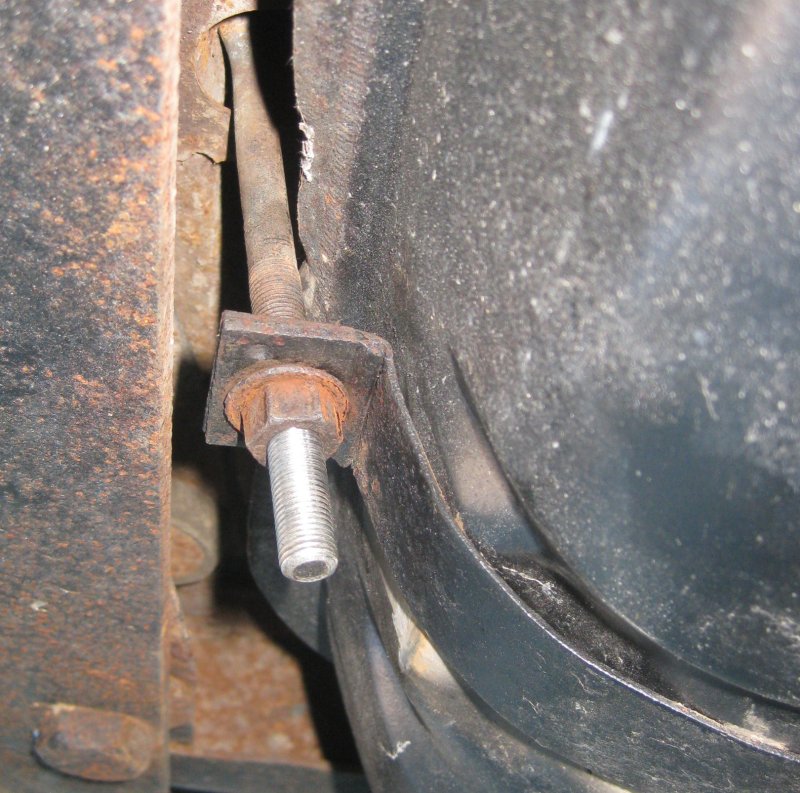
Thought of a few more things to add to the list. Tonight, programmed the radio presets. Figured out that the 2 main speakers on the back deck are wired with one as front and the other as rear. So I have no idea if that's 2 lefts or 2 rights, or 1 of each, or if that's a reasonable wiring choice, since the installation guide wouldn't download (but the operating guide did). Later, went back out to look at the wiring under the back bumper for the license plate light. Noticed the LH gas tank strap was loose, so put a wrench on the rear bolt, pushed, and the bolt fell out. It was not hooked into the correct hole, but just sort of slipped over the edge of the frame rail. So to get it in the right hole, will need to run the nut off, put the bolt in the right place, then run the nut back on. So got out some penetrating oil and scotchbrited the exposed threads. Got it a few turns down, then was tired of fighting with the wrenches up under the car. If I knew how the forward end of the strap went on, I could just unhook it, put this bolt in a vise and crank the nut off fairly easily. Ordered the shop manual on CD, so may need to wait until that arrives to finish this task - though the bolt threads look cleaner the farther out the nut needs to go - so it may be possible to get this apart and reinstalled correctly tomorrow.
4/3/13 - work a few things
Stopped by Harbor Freight on the way home and picked up a very heavy-duty floor jack. Jacked the car up and pulled the fuel tank strap off. In doing this, the rear attach bolt fell out of the strap. Why didn't I think of that yesterday? Just angle it around, and it comes right out. Anyway, was able to put the bolt in the vise, and with some liquid wrench, some scotchbrite on the threads, and working it back and forth, got the nut off. Got the strap back on the tank and the bolt back in place. Seeing it that way, though, I suspect this tank was replaced with a cleaner/newer one. And I want to pull the straps back off to clean them off, add fresh paint, and properly pad the strap to the tank (nothing between the tank & strap now). Went to the gas station and got 2 gallons of gas in a can. Added that so the car is safe to move to a gas station on its own. The transmission is weepy. Hope that's not major.
Don't threads just look perfect after a good long while of messing around with a vise, liquid wrench, threading the nut on & off a couple of times...
That other bolt in the lower left of the view measures ~1.15" across the flats (no, it's not 1 1/8 and it's not 1 1/4) - holds a thick steel strap across the rear-most frame member with another big bolt hanging down in the center. I believe this is the remains of a trailer hitch.
While the car was up on the jack and jack stand, I looked up under. Very minor surface rust. Don't think that's a big deal. Parking brake cable doesn't appear to attach to anything. Rear suspension is coil springs, short ladder bars, and a lateral location link. I saw somewhere else that short ladder bars makes the rear axle effectively a huge antiroll bar (the rear wheels move up/down only with minimal independence), but at least it looks solid. The heater hoses (under driver's seat) are cut - so no heat from there. May decide to figure out how to get that working again, but cabin heat isn't the big issue around here. Seat belts - saw no evidence of bolts through the floor for rear seat seat belts, so I don't expect there are any belts pushed back under the back seat. Front seat belts - I wanted to re-do this anyway, because each seat is a single-point attachment to the floor, but the washers on the bottom side are not as good as something like Juliano's seat belt mount plates which are intended to spread the force more and are much more resistant to pulling through the floor sheet metal.
Later, went back out and got the radio speaker grille on the dashboard off. Got the funny little plate with 2 red lights out from behind the speaker grille. Now can clearly see the little modern speaker that is behind there. Stopped at that point - resisted the temptation to unfasten that speaker to see if it could be moved to the original radio's speaker location. Will save that for another time.
4/4/13 - DMV, speaker & seat
First thing, stopped by DMV. Guy there says if there's a space for a notarization, it has to be notarized. So will figure out how to work that.
Got the fasteners off the speaker. At first it appeared to be stuck, but it was just the speaker magnet sticking to the heater duct (or whatever it is along the firewall). Got the speaker out. Made up a small plate to relocate the speaker to the original factory speaker location. Plate is .032 Aluminum, but I may just use that as a pattern, get the speaker hole & fastener locations right, then re-make it out of .040 or .050. A little more thickness makes a big difference.
Seat - decided to try pulling the back seat. Felt under the leading edge and didn't feel any obvious hooks. Decided to just try pulling up on the front - bingo. Front edge just lifts up, then the legs that support the front pop out. Pulled the seat forward, and yes, there is a single seat belt back there. Pulled it out over the top of the seat. Decided to put the seat back. Didn't realize there is a ledge that the front legs sit behind - so I pushed the seat back and it wasn't going down all the way. Felt under the forward edge again and realized - just push it back a little more and the front support just pops back down. Easy. Will be pretty easy to get the seat out to upgrade those belts.
4/5/13 - speaker & seat
Started by jacking the car up and safety wiring the parking brake cable to the frame, so it wouldn't drag on the ground. I think when the rear end was swapped with a later one, that no provision at all was made for a parking brake. Doesn't look like any sort of fitting or anything for it to attach to.
Next, wired the parking brake pedal to the up positition, so it wouldn't be dangling.
Pulled the back of the back seat out. Lift the bottom at the sides off 2 hooks, then the top slides down out of 4 hooks in the opposite direction. Pretty easy. Vacuumed under the seat. Not a whole lot there. Looks like back seat seat belts should go in pretty easily.
Next, worked on the front speaker mounting plate. Got the big speaker hole cut. Cleaned it up, primed and painted it flat black. Installed the plate in the dash, then the speaker to the plate. Bottom screws for the speaker would not go in because the speaker is contacting the bottom of the dash opening. May go back in there for longer screws at some point. Turned on the stereo. Yes, the front speaker is connected, and you can hear it now that it's moved out behind speaker grilles.
Fabbed a small spacer plate for the 3-pack of gauges hung below the speaker grille. This will allow the gauges to hang using the same 2 fasteners as the bottom of the speaker grille. Previously, they were stuck on the grille with self-tapping sheet metal screws (extra holes in the grille). On removal, one of the sheet metal screws lost its threads, and the other one was extremely long. Anyway, using the existing fasteners would be slicker. First plate I made was too short - didn't set the gauges back far enough to clear the speaker grille. I thought I had measured. Anyway, re-made the plate 3/4" longer. Works nice. All this work, and nobody's really going to be able to tell I did anything. I guess that's the way it's supposed to be.
Now a nice little 4x7 speaker behind that grille.


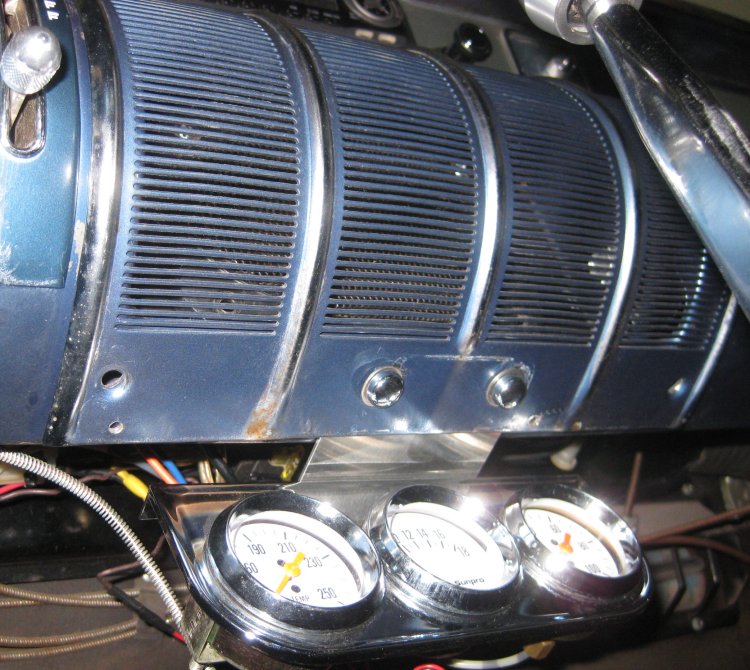
View from so far under nobody's really going to see the extra holes in the speaker grille or that the gauges are set back on a small bracket.
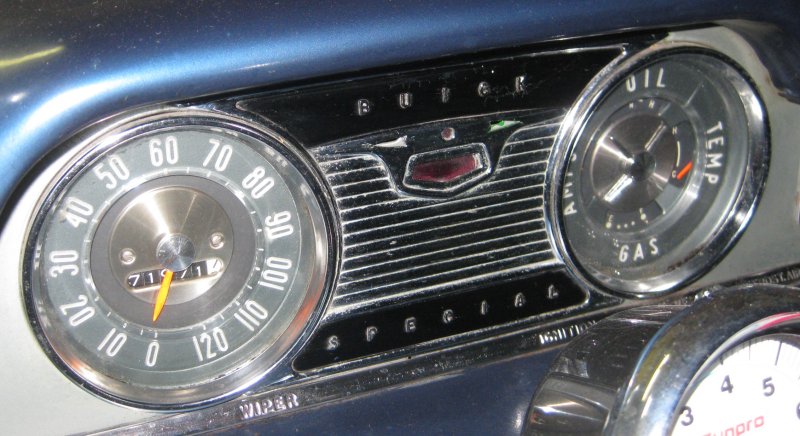
Just because - a view of the original gauges. That's 71971 original miles. Not million-dollar low miles, but just a survior that wasn't ever very far gone.
4/6/13 - seat belts
Checked the front seat belts are 5 feet each. The rear is 7 feet. Rear length might actually work ok if the attach points are about a foot farther back on each side. Since it's currently attached at a single point just under the back edge of the seat bottom, I want to relocate these farther back for a better angle between the seat cushion and the person.
4/7/13 - a little progress
Called Dickie in KY (on the title) and asked a little about the history of the car. Took some notes. He said he would look for the paint code on a gallon he had left in his garage. He said he thought the wheel lug nut adapter was in the car, but I couldn't find it. He said he would look. I mentioned that the title is a problem around here (signed, but not notarized). My wife's aunt gave us the idea of contacting a title company to see if they could come up with something. I mentioned to Dickie I might need his help with this. He seemed agreeable, but trying something else first may help his motivation if I show I'm trying to get this done.
Went back out later and removed some of the chrome fastener covers from the screws around the windshield frame. Counted about 17 of these. Just not my style to call more attention to windshield trim fasteners by blowing them up to much larger than actual size with chrome fastener covers. Still quite a few more to go in the back seat area. Not like this is any great step in restoration, but a bunch of little things eventually add up to big changes.
Reviewing forums, found a thread about restore-it-to-stock vs. customize-as-I-like-it in a Buick-specific forum. A few people were very hard-over about must restore it to stock, but most were in the it's yours, do what you like camp. One considered opinion was that if it's really rare, try to bring it back to stock or preserve it, but if it's a much more common model, don't worry about it. Then someone said they'd always wanted to do a 455 in a '55 2-door Special - like what I'm working on here.
So I had to go off and research the Buick 455. A couple of interesting points - more torque than any other factory muscle car engine (the ones you would think of - big-block Chevy, etc.). Lighter weight than any other factory big-block engine (25-35 pounds heavier than a Chevy 350, 100-150 pounds lighter than other big-blocks). So I could add a 455 and not kill the front suspension! Found some articles about building these for 700+hp, and then the lightness of the block comes into play - having to add girdles and other reinforcements. But I was thinking more along the lines of staying nearly stock - found a '71 Electra 225 with the big-block for only $1500 a few miles away on Craigslist - grab the engine & trans, sell the rest for scrap (too bad, it looks nice) - maybe save the power seat... Get the start of a really cool powertrain for maybe $1000.
4/8/13 - back to reality
Called the title co. that was recommended. Described my situation. They said, sure, they could notarize, if the seller is right in their office. Uh, way to solve a problem - NOT. Why would anyone bother with this so-called title company? Doesn't seem to be able to do anything I can't do myself. I was told people do this to avoid going to the DMV. I went to DMV last week - show up 10 minutes before they open & I was out 10 minutes after they opened. There's so much that they do that is online now, that if you plan ahead a little, there's not much to just going there and doing your own business. Why pay more to a title company that apparently can't do any more than I can do myself?
4/9/13 - leap of faith II
Called Dickie again - this time about the title. He seemed almost apologetic about not having it notarized, and said that he knew a guy down the road who could get it done for him. So I put it in the mail - back to Kentucky. Say another prayer that humanity is generally good and honest... And maybe next week sometime I might be able to get a plate for this thing.
Later - went out and pulled a few more screw-head covers off in the back seat / back window area.
4/10/13 - reverse lights
The reverse light lenses that I won on eBay arrived. A little dusty on the inner surface - how do things look so clean in digital photos? Anyway, cleaned them up and installed them. Something about the tail light housings full of stock lenses - just looks right.
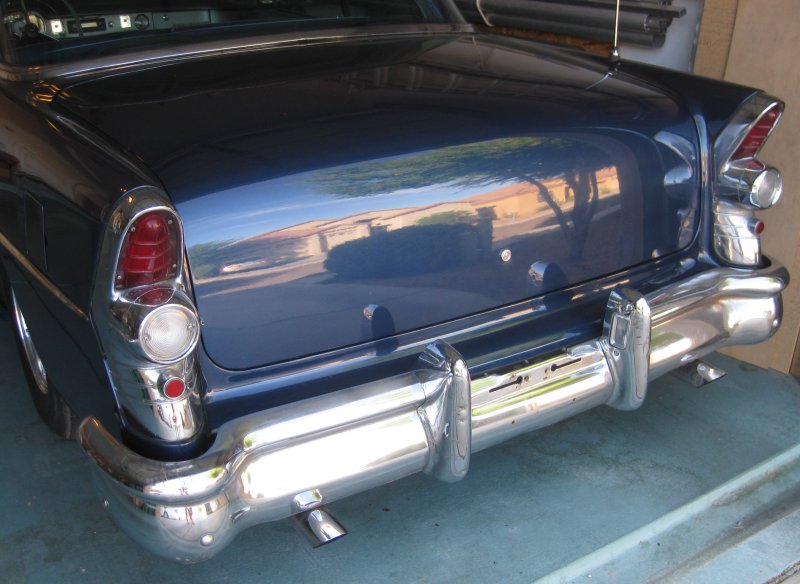
That just brightens it right up.
4/12/13 - Title!
Dickie called to say he got the title notarized. Missed the mail today, but it will be on the way back here tomorrow! Cool.
4/13/13 - seat belts
Mocked up the seat belt lengths to the Juliano's available sizes. Originally, I thought 4 sets of 24 + 36 belts. Glad I mocked it up. The back seat will work with the 15 + 43, and the front seat really needs the 31 + 43. The front will have about a foot of tail beyond the buckle - which is about the same as 24 + 36 at its farthest extent. But that would leave no wiggle room, and if someone smaller needed to move the seat forwards, the belt would probably be too short at that point.
Ordered an Americanshifters shift knob. The stylized piston one in the car now has a universal thread adapter that is just worn out - the knob is loose. The way I see the interior is pretty much stock. Sure, there's the added-on gauges and the modern stereo, but other than that, the shifter is what makes it obvious that this isn't stock. I like the style of the stock interior anyway.
4/15/13 - orders & ordering
Shift knob arrived. Looks pretty cool. But the adapter to the shifter is from another distribution center or something - it wasn't with the knob. Ordered a book on the Turbo 350 trans, as this one is leaking quite a bit around the pan flange. For $14, I'll read up on it a bit and think about fixing it before paying someone else to do it.
4/16/13 - title & plate
Finally got the title and plate. Wasn't too bad - went to DMV at ~2:30 on a Tuesday afternoon; took about 45 minutes. Took the stock plate - didn't pay for any customization right now. But at the cost, $35 for 2 years, I can probably stand to add $25/year for custom numbers. Right now it's BAM1920. Took Evan for a ride around the neighborhood. Then, after dinner, took Lila for a ride around the neighborhood and added 10 gallons of gas. Cool - the gas gauge actually works. Not as rock-solid slosh-damped as a modern gas gauge, but it should keep me from running out. In taking Lila around, noticed that the speedometer is pretty optimistic. I guess that might mean the so-called '63 Riviera rear end might be a higher ratio than what was originally in the car. I looked up rear axles on a Riv history site - 63 it should have the ratio stamped on the bottom. I will have to go look. Otherwise, it's jack up 1 rear wheel, give it 2 turns and count the drive shaft revolutions. (Unless it's a posi, in which case must jack up both rear wheels.)
After I got back with Lila, needed to get a bee out of the back deck, so I left it running in the driveway. Got the bee out. Lila had put down the R rear window, so I went around that side to help pull it up (the handle / drive slips). Opened the door and the door seal fell off the bottom of the door. Tried to shut the door while holding the seal up and just pinched my finger. Got some masking tape (yeah, I fixed it)...
Went out later to look at the engine - after more driving than it's seen so far. Saw coolant on top of the battery. Huh? Coolant drips on the garage floor just forward of the front cross member. Splatter of coolant under the hood. Ah, there it is, running down the back center of the radiator. And a hissing sound. The radiator cap's no good. So will need to fix that.
4/17/13 - radiator cap & shift knob
Changed the way-home routing to pass by the Auto Zone. Looked around inside their store - I think they have some fasteners that will work on the back seat side panels to replace the ones with the funky plastic "chrome go-faster" fastener covers. And no radiator caps just sitting out. So I asked the guy at the counter. He asked what kind of car. I said it's an antique. He said, try it anyway. So they have a 1955 Buick Special model 40 in the computer, and come up with a cap that looks nearly like what I brought in. Pretty amazing. Oh, and this cap has a whole rubber gasket where the old one doesn't. That oughta cover that. And the shift knob adapters came in, so I got the shift knob locked on solid.